SHOE MAKING 101
Shoe making is the process of making footwears for fashion or for Comfort.
TYPES OF FOOTWEARS
1. Slippers
2. Sandals
3. Shoe
4. Boot
MATERIALS USED TO MAKE FOOT WEARS.
1. Cotton fabrics
2. Ankara
3. Denim
4. Aso oke
5. Carpets
6. Leather etc.
TYPES OF LEATHER
1. Patent Leather; wetlooks
2. Animal skin leather; snake, crocodile, goat, etc.
3. Suede
4. Nubuck leather etc.
Having learnt and practiced shoe making for some years , I can say that anyone can learn to make footwears, as long as they have patient, right materials and leather with basic shoe making tools.
In this article we will be learning step by step how to make a leather slippers.
HOW TO MAKE A LEATHER SLIPPERS
Making your very own slippers is a fun way to add originality to your fashion style, It is also a way of making slippers for your own comfort.
STEPS TO MAKING A LEATHER SLIPPERS
So make a slippers will require few tools and materials, making a slippers is one of the basic skills in shoe making , because it is more straightforward and an entry points to learning more about shoe making in general.

TO MAKE YOUR OWN SLIPPERS, YOU’LL NEED;
1. Cardboard
2. Pencil
3. Eraser
4. Leather
5. Marco
6. Board
7. Leather Linen
8. gum
9. Sole
10. Moccasin tread
11. Needle
12. Punch
13. Punch board
14. Mallet
15. Sand paper
ANATOMY OF A FOOTWEAR; SLIPPERS
1. Upper: this consists of the leather and linen
2. Insole : it is the board , Marco and linen
3. Sole : this can be a ready-made or cut sole
i . Rubber sole
ii. Leather sole
NOTE THAT : every footwear ; slippers, Sandals, shoe, boots contains these three footwear anatomy.
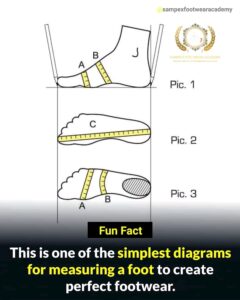
STEP 1 : MEASUREMENTS
you can do this by using a measuring scale or do it the traditional way using a tape rule from 15 cm from your toe till the sole of your feet.

STEP 2 : PATTERN DEVELOPMENT
Make a pattern for your slippers , start by figuring out the design of the slippers you want to make. Then make some pattern by playing around with your pencil and cardboard. After drawing your preferred pattern on the cardboard, cut out your pattern with a scissors.
STEP 3 : LEATHER CLICKING
Trace the pattern from your cardboard on your leather , after tracing it , cut out your patterned leather .
STEP 4 : LEATHER CLOSING
Trace your pattern leather on your leather linen , after tracing apply gum on your leather and your linen . Wait for it to dry before sticking together , after sticking together use a mallet to hit it so it doesn’t separate . It is also the process of making an upper.
STEP 5 : LEATHER STICHING
Use your punch on your leather to create holes where the needle and the moccasin thread will pass through . After creating holes use your needle and morcasin thread to start stitching up your leather .
Hand stitching leather can serve as a design on your leather or a substitute for when there is no sewing machine to sew your leather and lining . Although it is a very old method it is still effective.
STEP 6 : INSOLE MAKING
Insole is where your feet stays on in your slippers. Making an insole requires a board , marco and leather linen.
Start by tracing out your ready-made sole on your cardboard this is to make a foot template, after tracing it out cut out the foot template and trace it on your board . After tracing it on your board cut out the template that you’ve made with your board and place it on your macro and trace it out , after tracing out on your macro apply your gum, stick your marco and board together use a mallet to hit it to avoid separation and cut it out. Apply gum to your leather linen and Wrap your Marco and board with your leather Linen .
After this put the insole in your sole to see if it is sitting well in your sole . This is to make sure that you got the right size of insole.
STEP 7 : LASTING
This is the part where you last your upper and insole together , it is the structure of the slippers.
While lasting you have to make sure it is firm on the feet so that when done it doesn’t look lose wearing it.
At this point you should already be seeing your imagination come true
STEP 8 : SOLEING
This is the parts where you , use your sandpaper to roughen your insole and your sole , after you have roughen it apply gum to your upper , insole and your sole and then stick it together.
Use a mallet to hit it so avoid your insole and sole from separating.
STEP 9 : FINISHING
This is the parts where you check for loose thread burn it with a lighter, and clean every gum stains. This is to make sure it gives it a very presenting and neat looking work. It is kind of like a finishing touch .
And then your Leather slippers is ready so wear.
By making your footwea;r slippers by yourself you can make it very comfortable to wear to prevent your your feet from suffering in the harsh weather condition and bad road conditions.


